Click to Play the User Guide Video to create dashboards, Connections & Widgets.
How to use MqttDesk with MQTT
protocol as a MQTT Client?
This page would help you to work smoothly on the MqttDesk app which works on MQTT protocol.
We tried our best to cover almost all main points in the user guide but if you would need more detailed functionality then please write to us or chat with us or for basic understanding about the MQTT Protocol, please use the MQTT tab on main website.
Key points to be remembered while downloading & using the MqttDesk.
During Installation to windows, macOS & Linux , there can be errors showing that the application is not safe to keep or install. Please ignore it as MqttDesk is very secure to download and use.
Don’t use ‘#’ & ‘+’ directly in widgets to avoid lots of data on the dashboard.
Change the Client Id for the Shared connection to another MQTT Client to get connected.
Math Function for subscribing Topics only for specific widgets.
To Publish & subscribe to the JSON use the standard JSON format & refer to widget configurations for more on Publishing the JSON.
To the auto-reconnect, the function of the Connection to MQTT broker, select the auto-reconnect checkbox.
Use the square icon to make the dashboard full screen & press escape key to view in a normal window.
Restore any old backup will overlap the present connections setting & dashboard and all other settings..
With the help of below writeup about the MqttDesk application you can add the connections, create the dashboards and add multiple widgets on dashboards to monitor the Published & Subscribed topics with different configurations on IIOT devices, Smart home systems & Home automation systems through the MQTT protocol.
Major key points to understand the functioning of the MqttDesk MQTT Desktop Client.
Settings
Connection
Dashboard
Widgets
1. Settings: Application settings use to define the universal settings for the MqttDesk application.
Language selection can be selected from settings too.
Theme can be selected from settings as Dark or Light.
Decimal no. selection is use to select the no. of decimals can be monitor in app.
Auto click on Connect – When we click and select this option then just click on connection name, It will connect to MQTT server automatically.
Backup & Restore is use to take backup & Restore of the MqttDesk application it consists of all the dashboard, connection & widget configurations.
But when we restore the backup , it will remove the existing configurations and just restore the selected backup. It would overlap the existing configuration. Backup might contain the User name & password for the MQTT Broker. Don’t share it publicly.
2. Connections – Connections are use to connect to MQTT Broker. MqttDesk is developed to work with MQTT v3.1.1 & MQTT v5.0 servers. You can connect any MQTT ver. server with MqttDesk application.
Click on + Button in Left Tab and add the configurations related to the MQTT broker & connection.
Name of the connections is mandatory.
Client id – You can keep it blank if you don’t have a client id, MqttDesk will randomly generate a client id for this connection.
Port – Input the port to be use for MQTT broker relates to TCP/WEBSOCKET or SSL based TCP/WS.
Server Name – Name of the server or IP address required e.g.- test.mosquitto.org or 192.168.0.101.
Protocol – MQTT Protocol to be define here TCP/TLS/ Web socket / Web socket SSL.
SSL/TLS required Certificates/Keys for the client to securely connect to MQTT broker and monitor & control the IIOT devices. Use openssl to generate the certificate. Linux & macOS have openssl by default but for windows you have to install it.
Advanced connection settings
Keep alive
Click on Auto reconnect or clean session
Selection of MQTT broker MQTT v3.1.1 & MQTT v5.0
Right Side header tab options for Connection settings like below-
Clone a connection – Clone it in the application itself
Share a connection – Share it through MQTT Protocol with publish & subscribe options to other Client.
Edit a connection – Click on any connection to edit it from this option.
Delete a connection – Click to delete a connection.
3. Dashboard – User can create ‘n’ nos. of dashboards for a single connection like your Arduino & Raspberry Pi & ESP32 connected to a MQTT broker and you can create separate dashboard for them under one connection. Or different brand of PLC’s or IIOT devices connected to MQTT broker and we can create multiple dashboards respectively for all the PLC’s.
Click on this button to add the dashboard with name & icon.
Click on right side tab to get the dashboard settings like add widget, clone dashboard, delete dashboard.
Clone any dashboard to other dashboards under different connections to save time for rebuilding the Dashboards.
4. Widgets – Widgets comes under the dashboard section where we can add multiple widgets on the dashboard and monitor the IIOT devices. Like we can create dashboards for Smart Home systems, Home automation systems & IIOT devices.
MQTT protocol is the only protocol use to get data from these systems.
Widgets can be drag n drop, resizable and lock feature for dashboard.
Widgets using the same terminology used by the MQTT protocol.
Panel Name – You can give any name to the widget like ‘ESP32 LM35 Temperature Sensor‘.
Topic – Topic is required, on which your broker is publishing or subscribing. for example
‘Home/Kitchen/ESP32/LM35’ or ‘homeautomationsystem/Garage//Raspberrypi/Sensor’
You should be careful to write the topics as they are case sensitive.
Payload – If the data is subscribing through the json payload then we will parse the json under jsonpath.
Standard json format to be used to parse the json data. Refer to the bottom of the page which show examples for the json payloads.
Timestamp – Timestamping is the time when your topic publish or subscribe it stamps that time on the widget.
QOS – Default QOS will be QOS0 if not selected.
Unit – Unit will be the field used to display the measurement like ‘Meter, inch, Celsius’ etc.
for example in Value widget we can show the current load in ‘Raspberry Pi =30A’.
MqttDesk is equipped with 27 different widgets to use for visualization.
Text – This is use to subscribe the text data other than numerical from other clients through MQTT protocol.
Like Raspberry pi, ESP32, Arduino based MQTT Clients published the internal alarms like ‘Battery failure’ or ‘Battery full charged’.
Value – Value widget subscribe the numerical data only to monitor. Use math function for accurate visualization.
Slider – Horizontal or Vertical sliders publish or subscribe the topics from other clients.
User can send the analog values as per the defined min. & max. payload in widget.
it can be ‘0 to 10000’ or ‘10.10 to 550.20’ values publish to any MQTT Client.
Button – Use to send the configured messages to other Home Automation systems.
Switch – This widget is used to switch on/off any IIOT or IOT device. Default is the simple switch but you can choose the icon from 1106 nos. of different icons as switch. for example it is use to switch on a LED connected to your ESP32, ESP8266, Raspberry Pi or Arduino controllers.
Combo Box – Use to publish & subscribe the multiple payloads to single topic.
Radio Button – Use to publish & subscribe the multiple payloads to single topic.
Multi state Indicator– Use to subscribe & display more than 2 states of the IOT device.
Led Indicator – Display the on/off state of the IOT or IIOT Devices through MQTT broker.
Text Input – This widget is use to publish the messages to any of the devices or use as message sender to other MQTT Client.
URI – Subscribe to topic and display the URL links in the widget only. Limited visualization of the URL’s due to iframe limitations.
Image – Monitor your camera still images through MQTT protocol to MqttDesk as MQTT protocol use low bytes transfer protocol. Static image display on widget without MQTT or static image display through subscribing to a topic.
You can also push a image to other MQTT client.
Text Log – Use to show logging of the subscribing topic and see the unlimited no. of points.
Vertical Progress – This is a subscribe widget only to visualize the Temperature, Level, Pressure etc.
Use math function for accurate visualizations.
Circular Progress – Subscribing to the Temperature, Level, Pressure etc.
Gauge – Visualization of the different ranges(0-30-60-100) of the analog values like level, Pressures & Temperature with different colors.
Color Picker – Publish the color through MQTT protocol to other MQTT Client and can be use to control the LED strip colors.
Time Picker – Publish time & current time to other MQTT Client.
Node status – Use to visualize the status of the connected other MQTT Client through MQTT protocol and synchronize with them to get the actual status of the MQTT Client.
Line Graph – Line Graph subscribes the multiple representation of data on X-Y axis.
Here, X-axis is Time & Y-axis is Value. Points, Area & Line may select from the widget.
Real-time data export to csv format to your desktop. Configure Zoom & Pan with a selection on the graph. Math function would work with single data only.
Chart – Use to subscribe the data in Pie & donut charts to visualize & analyze multiple data.
Bar Chart – Horizontal & Vertical bar chart for subscribing multiple data to visualize and analysis.
Histogram – Visualize bins & frequencies for multiple subscribing data.
Map – Subscribe to the Longitude & latitude topic and visualize only locations of the assets.
Informative text – Use to subscribe the text data with the conditional expressions like show an alarm for ‘High temperature’ on the widget.
Information shared above with the intention that user have basic knowledge of MQTT protocol, MQTT Client & MQTT broker. There might be few corrections or update required here & after user’s feedback , we will update the information.
Lets connect and share the feedback
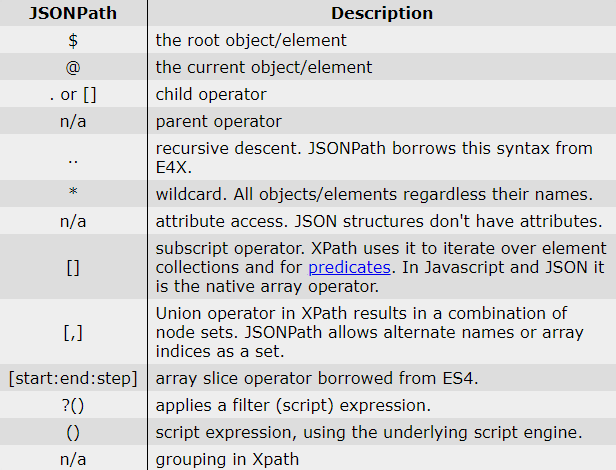
Use the Below JSONPATH for Extracting JSON Payloads.
Math Function Example
(%value% is the payload )
Few of the following example for the Math function on Subscribed Payloads.
Math function is taken from Math.js library.
(100*%value) -Used for multiplication for subscribed payload.
(32/(100*%value) – More calculations.
round(%value%,2) – Round off to any decimal for subscribed paylaod.
(sqrt(%value%)) – Square root of the subscribed payload.